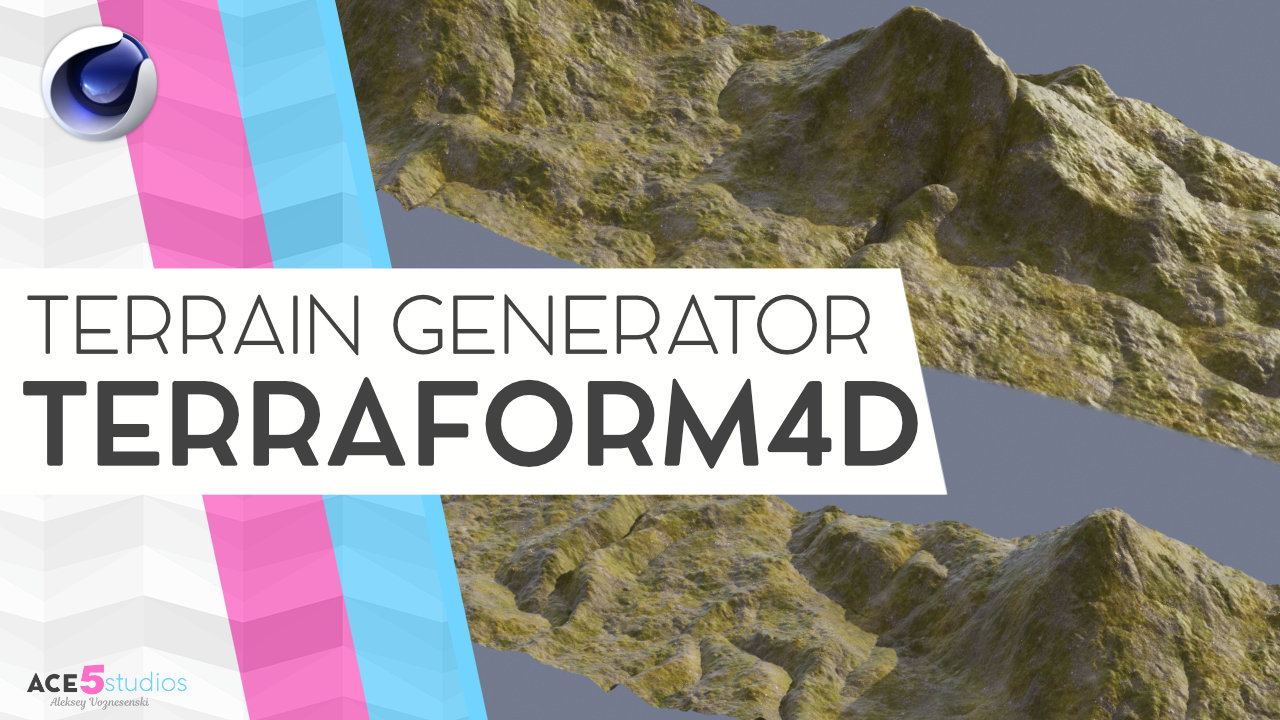
5 things i wish i knew when i was starting out as a 3D artist

People often ask where to start and what to do to become a 3D artist like me.

Im not sure i’m the right person to ask, since i just kinda stumbled into this by accident. But there are some very important things i learnt, which i wish somebody told me earlier, so i will share them here.

1. This is not a stable, predictable or lucrative career. If you need money, if you have to support your family, this is really not the career for you. It’s super unpredictable, skills you need shift yearly. You might spend a year learning something, just to have a piece of software come out that renders all those things you learnt obsolete.

You really got to love what you do, because it’s gonna be hard. It’s like the story of people who go to Hollywood to become actors. It’s kinda like that, but you add global outsourcing to that.

Now if you’re still here i have some useful info for you.

2: EVERYTHING is a remix. Everything you see made is rehashes and reworks of the work made before by other artists, thinkers etc. Current copyright laws kinda throw a spanner in the works, but it just means you have to be more creative in your efforts. This is something that no one ever told me, and i always tried to come up with everything myself. That is a mistake. Copy, transform, combine is the secret to success.

The reason for this is simple: There is nothing truly original you can come up with. All the things you imagine and create are influenced by things you have seen/read/used before. Invention is an iterative process, hitting things with your fist, turned into rocks, turns into hammers, jackhammers etc.. So you might as well take a good analytical look at the things that are inspiring you and figure out what it is that you like about them and implement that into your work.

Watch this video it goes into more details with a stunning amount of examples: https://www.youtube.com/watch?v=nJPERZDfyWc

Also this is fun to watch: https://www.youtube.com/watch?v=hjmaOj3_sKk

And you can see this pattern not only in Disney movies, you can see it throughout Hollywood. And throughout human history in architecture, art, stories, books, myths etc.. It’s all an iterative “small steps” process.

3: Getting good takes time. Developing your own style takes lots of work. Just keep doing it. If you can tell your work sucks that is the most important thing. Because if you can see it sucks, it means you will be able to see when it stops sucking. The biggest problem is people who think their work is awesome. Because they can’t improve. They can’t take criticism. So if you think your work sucks, congratulations! You might become a worthy artist.

Ira glass the gap, is a great speech to listen to, nice and short too: https://www.youtube.com/watch?v=nfA9OH6dAQ8

The missing chapter is a great video which talks about all the work that great artists made that no one has ever heard about: https://vimeo.com/87448006

4: Find people who inspire you and copy them, and try to get your work to be like their work. It’s the fastest way to grow. Don’t pass it off as your work, be clear that you are just recreating work that you find inspirational. This is very important, the internet has made everything very small and searchable. You will be exposed and no one will work with you. But while you copy you will learn and start to understand what it is exactly that makes the work you admire great.

This is something more specific to mograph and tv commercials, but nevertheless this guy makes amazing videos explaining concept development and the thinking that goes into creating cool stuff: http://www.division05.com/#episodes

5: Color theory is a topic which can hugely affect your work. Once again, grab color combinations from other places, photos, works of art, nature etc, and use them. Then slightly adjust them as you need. This is the best way to start out while picking colors. But also try to figure out why certain color combinations work and others don’t pay attention to what you associate certain colors with and then try and figure out why. It’s all about observation. 

Great color theory video right here: https://www.youtube.com/watch?v=Qj1FK8n7WgY

Bonus tips:

I’ve found a great way to judge your own work, or try to figure out what’s missing. Is put it up side by side with the gallery of an artist you admire and see if your work looks like it belongs there.

Use pinterest to collect work that inspired you, you can sort it into boards and turn to it when you need references. Also its a great place to put your own work and see how to feels on a board full of works that inspire you.
Some good pinners to follow:
https://www.pinterest.com/bixorama/
https://pinterest.com/em404p/boards/
https://www.pinterest.com/characterdesigh/boards/
https://www.pinterest.es/raoul1983/

So there you have it, a quick list of stuff i wish i knew when i was starting out. If you have any stuff you think would be helpful to beginners and professionals alike post it in the comments. Im sure there are lots of things i wish i knew that i do not know yet 🙂

Spline IK – What is Spline ik? – Cinema4D tutorial

Use spline IK to rig your character spines, and much more! SPINE SPLINES!
Lets learn about making character spines using the Splike IK tag in Cinema4D. help your character dance and wiggle its hips better than ever!

Check out this spline animation tutorial for more spline animation goodness: https://ace5studios.com/spline-animation-tutorial-c4d-dont-use-pla/

Cloth Simulation to make a basic top tutorial

Cinema 4D’s cloth sim system isn’t the most advanced in the world, but I did find a way to simulate a nice top with it. So here is a tutorial about it. I also cover how to modify cloth objects and then keep simulating them.


Actually simulating cloth on moving characters doesn’t go quite as smoothly as you can see here, but i guess it just needs more work. I’ll also try xparticles cloth sim tools some time soon.


View this post on Instagram


A post shared by Aleksey Voznesenski (@alekseyvoz) on


Looking for a way to attach clothes to characters without using the cloth simualtion? Here is a handy video about that:


A good way to stick clothes to a character if you don’t want to simulate them after you made them can be found here : https://ace5studios.com/surface-deformer/

C4D icons and their colors

Ever wanted to change the icons or the colors? Well this is how you get into it.

Download the file below, navigate into your c4d install directory, and then navigate to “resource\modules\c4dplugin\icons” and paste it there. ( make a backup of your original).


If you found this interesting, also check out this tutorial about UI customization: https://ace5studios.com/ui-customization-in-maxon-cinema4d/

customize the UI of cinema4D tutorial image

Looking for version icons?

Tag Buttons

Ever wanted buttons for stuff like Protection tag, cloth or other stuff, well now you can. If you need any other buttons, just let me know and Maria will whip em up for you. ( also show her some support on her instagram page)

Also these scripts will finally allow you to create keyboard shortcuts for these tags. Which can save a lot of time if you apply protection tags regularily.

Download Scripts

Kevin made some redshift buttons for you all, just throw them into the same folder 🙂

Download Redshift Tag buttons

If you found this interesting, also check out this tutorial about UI customization: https://ace5studios.com/ui-customization-in-maxon-cinema4d/

customize the UI of cinema4D tutorial image

FFD deformer tips

In this tutorial i go over how to more effectively use the FFD tutorial in Cinema 4D. Use a pose morph tag to store states, you can also use the same tag to transfer info between FFD objects


If you found this interesting, also check out this tutorial about UI customization: https://ace5studios.com/ui-customization-in-maxon-cinema4d/

customize the UI of cinema4D tutorial image

IK vs FK – Whats the difference why do you need them?

Ever Wonder what the difference between FK and IK is, when rigging this is a pretty common term. I go over the differences here and when you should use which one.


If you found this interesting, also check out this tutorial about UI customization: https://ace5studios.com/ui-customization-in-maxon-cinema4d/

customize the UI of cinema4D tutorial image

Tokens – file paths and naming made easy!

In this tutorial i go over how to use tokens and relative paths to making saving renders easier than ever.

Why do things by hand, if you can automate it? also great for keeping naming conventions consistent throughout projects and eliminating typo’s.
Some of the more common tokens are:
$prj: Project file name
$camera: Current camera name
$take: Current take name
$pass: Multi-Pass or object channel name (the defined multi-pass names). Primarily to be used as the directory name.
$userpass: Multi-Pass or object channel name (the multi-passes renamed via double-click in the Render Settings (opened Multi-Pass tree view). Primarily to be used as a directory name.
$frame: Current animation frame
$rs: Current Render Setting name
$res: Image resolution (e.g., 800*600: 800X600)
$range: Animation range (e.g., from frame 23 to 76; 23_76)
$fps: Frame rate
With CV-tokens you get some other very useful ones like:
$cvHeight: so you can name your renders based on vertical resolution, so you get “render_720” or “render_1080p” by using “$prj_$cvHeightp”
$cvUsername: Also super handy, you can add it to just folder name for example, so you know where the render is coming from, but doesn’t interfere with file naming
$mm $ss: For minutes and seconds, so you can save every render without over writing or saving incremental files, great for looking back over your project.

Do you have any questions? Be sure to ask in the comments and i’ll add the answers to this post for everyone to see.

If you found this interesting, also check out this tutorial about UI customization: https://ace5studios.com/ui-customization-in-maxon-cinema4d/

customize the UI of cinema4D tutorial image

Ultimate #TwoLeg4D Free Cinema4D Character rig!

Fully rigged #TwoLeg4D character for cinema 4D


Hey Guys, Got a New rig for you, this time it’s the two legged egg thing, thanks to the talented Ugur Ulvi Yetiskin! Make sure to check out his other maya rigs in the link below.


The original Character and rig for maya was made by Ugur Ulvi Yetiskin

Hint: Bind “reset psr” to an easy shortcut if you haven’t yet 🙂


If you use him and post somewhere make sure to tag him as #TwoLeg4D


Get the Cinema4D rig of TwoLeg here:


Download 2Leg4D
( if you really don’t want to share, or don’t have an account, just close the window that pops up after you click on one of the buttons, and then you can download)
Check out my products page for more free rigs: http://ace5studios.com/products

Also don’t forget to follow me and Maria on twitter for more free rigs!

https://twitter.com/ace5c4d

https://twitter.com/Jersy_C/

HUD – Heads up display

In this tutorial i cover various elements on the HUD in cinema 4D that you might not be aware of.

HUD is great for seeing important scene information without having to scroll through your object manager, also giving you the ability to adjust these numbers with ease. You will be able to see how many points/faces you have selected, the fps of your current scene, switch quickly between cameras and objects, turn subd object on and off.

Do you have any questions? Be sure to ask in the comments and i’ll add the answers to this post for everyone to see.

If you found this interesting, also check out this tutorial about UI customization: https://ace5studios.com/ui-customization-in-maxon-cinema4d/

customize the UI of cinema4D tutorial image